Reinhard Geisler
The GIMP
Gimp (GNU Image Manipulation Program) is a free, powerful tool
for image manipulation. More information at the
Gimp homepage.
GIMP plug-ins
The following plug-ins are free software under the terms of
the GNU General Public License (Version 2)
as published by the Free Software Foundation.
The edit image comment plug-in
This Gimp plug-in edits the image comment.
"<Image>/Image/Edit Comment".
Source code of the edit comment plug-in (gimp 2.0)
Source code of the edit comment plug-in (gimp 1.2)
The interlace/deinterlace plug-in
This Gimp plug-in interlaces/deinterlaces all layers of a film
(multilayer image).
interlace: The number of layers is divided by 2 merging two successive
layers into even/odd numbered lines of one layer. You can keep the image
height by dropping lines or double it and keep all the lines.
deinterlace: Even and odd numbered lines of each layer are stored into
two separate layers. Thus the number of layers is doubled.
Lines in between are interpolated or skipped (selectable), i.e.
the new image has the original height or half of it.
You find it at "<Image>/Filters/Animation/Interlace Tool".
Source code of the Interlace Tool (gimp 2.0)
Source code of the Interlace Tool (gimp 1.2)
The layer extract plug-in
This Gimp plug-in creates a new image/film by periodically extracting
layers from another image.
It takes one interval (number of sequent layers) every period.
The number of periods can be limited.
"<Image>/Filters/Animation/Layer Extract"
Source code of the layer extract plug-in (gimp 2.0)
Source code of the layer extract plug-in (gimp 1.2)
The poster plug-in
This Gimp plug-in combines image layers by attaching them in
rows and columns.
This is useful especially for films.
The plug-in attaches the layers of a RGB or grayscale image
row by row from the left to the right.
The frames are separated by lines of selectable width
in the current foreground color.
If the row/column matrix is too small for all layers,
the last layers are skipped.
If the row/column matrix is too huge for the layers,
additional slots are filled with the current background color.
Now, how does this look like???
Let's take the well-known high-speed film
of an oscillating cavitation bubble...
For a better visibility we choose a red foreground and a blue background
color and select "<Image>/Filters/Animation/Poster" afterwards.
With Columns = 12, Rows = 8 and
Width of separation line = 4
the resulting image is:
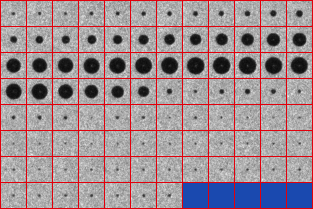
...just to be nice I also reduced the size by a factor of 4.
Source code of the poster plug-in (gimp 2.0)
Source code of the poster plug-in (gimp 1.2)
Source code of the poster plug-in (gimp 1.0)
The split plug-in
This Gimp plug-in splits an image into layers.
The plug-in cuts an image into a number of rows and columns and
composes a new multilayer image (film) of these pieces.
It's just the reverse of the poster plug-in.
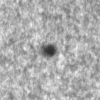
Now, how does this look like???
Let's take the just created poster
and split it up again:
We select "<Image>/Filters/Animation/split into frames".
With Rows = 8 and Columns = 12 we select
"Row by Row",
"Left to Right" and "Top to Bottom".
The resulting film is:

Source code of the split plug-in (gimp 2.0)
Source code of the split plug-in (gimp 1.2)
Source code of the split plug-in (gimp 1.0)
The streak plug-in
This Gimp plug-in is a simulation of a streak camera.
A streak camera images an object through a slit - thus getting a kind of
"one dimensional image".
This image is propagated along the second dimension of the image plane
at a constant speed.
The result is a picture of the time dependency of the object.
The plug-in takes a film (multilayer image), cuts a slice of
selectable width and position out of each layer and puts the
slices together to the streak image.
Now, how does this look like???
An example:
Let's take a high-speed film of an oscillating cavitation bubble
- just like we get it in everyday physicists life ;-)
and select "<Image>/Filters/Animation/Streak".
With slit position = 50 and slit width = 2
the resulting image is:
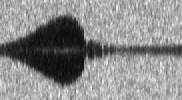
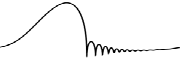
This image shows the time dependency of the bubble diameter.
The calculated radius-time curve looks like this:
Source code of the streak plug-in (gimp 2.0)
Source code of the streak plug-in (gimp 1.2)
Source code of the streak plug-in (gimp 1.0)
The uc-avi plug-in
This Gimp plug-in loads/saves uncompressed AVI files.
The plug-in loads common uncompressed AVI files into multilayer images.
It saves multilayer images to uncompressed AVI.
Audio is discarded, only one video stream is supported.
Compressed AVIs may be loaded using mencoder to import.
Source code of the uc-avi plug-in (gimp 2.0)
Source code of the uc-avi plug-in (gimp 1.2)
Questions, bug reports, suggestions,... to:

Back to the homepage